
Installation Guide
This DIY turbo installation guide will walk you through everything step by step, from prepping your engine bay to tightening the last clamp on your new top-mount turbo setup.
Installing a turbo might sound intimidating at first; lines, fittings, gaskets, heat shields, wastegates, it’s a lot. But the process becomes much more approachable when you break it down into manageable steps.
It’s not just about slapping a turbo on your engine; it’s about building something with your own hands, understanding your car better, and feeling that deep satisfaction when it roars to life.
So, without further ado, let’s get into finding a full breakdown of every part, where it goes, and how to install it like a pro without the guesswork.
What’s Usually Included in a General Turbo Kit?

Here’s what you’ll typically find in a standard turbo installation kit:
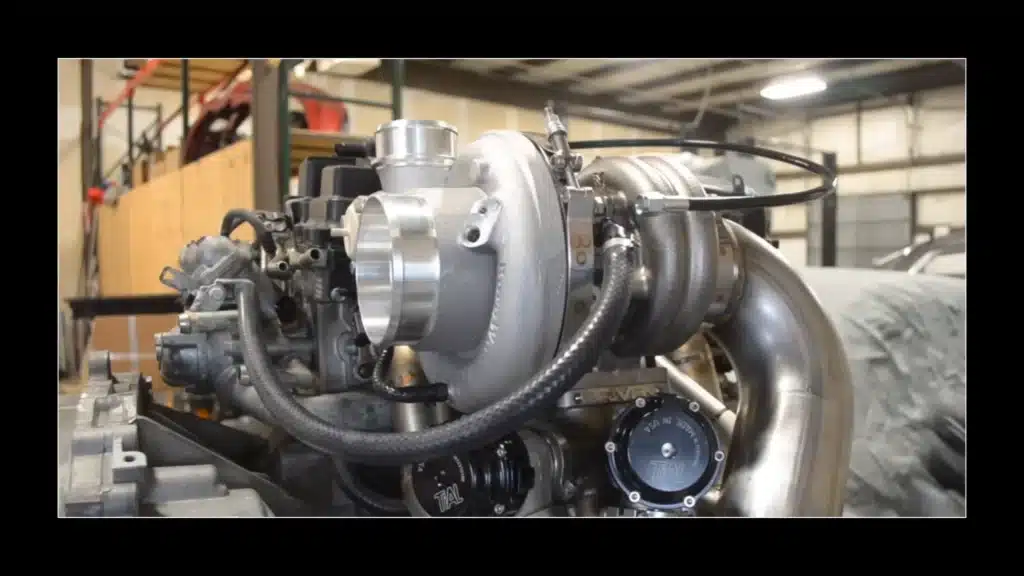
Turbocharger
The main star of the show—this is what gives your car that extra boost in power.
Exhaust Manifold
Connects the engine to the turbo. Some kits include a cast or tubular-style manifold.
Downpipe
Carries exhaust gases away from the turbo and into the rest of your exhaust system.
Oil Feed & Drain Lines
These lines deliver oil to the turbo and return it back to the oil pan. You’ll usually get both hard and soft lines.
Coolant Lines (If Water-Cooled)
Help manage heat by circulating coolant through the turbo.

Gaskets & Seals
Including turbo-to-manifold gaskets, downpipe gaskets, and O-rings. Always double-check for proper sealing.
Mounting Hardware
Bolts, nuts, studs, washers, and sometimes Nord-Lock or lock washers to secure everything.
Wastegate (External or Internal)
Controls boost pressure and prevent over-boosting. Some kits include springs, flanges, and dump tubes ,too.
Boost Control Solenoid or Pigtail
Essential for electronic boost control systems.
V-Band Clamps & Couplers
Used to secure piping and exhaust components. Makes for an easier fit and tighter seal.
Heat Shielding or Wrap
Protects nearby components from excess heat.
Intake Piping & Intercooler (Optional in Some Kits)
Routing compressed air into your engine is usually paired with a front-mount or top-mount intercooler.
Step-by-Step DIY Turbo Installation Guide (For Most Kits)
1. Prepping for the Install
Before you pick up a wrench, get everything ready:
- Clean your engine bay: Dirt and oil can mess with fitment and sealing.
- Disconnect the battery: Safety first.
- Let the engine cool down completely: You don’t want to burn yourself.
- Gather tools: Basic sockets, wrenches, pliers, a torque wrench, and red RTV sealant are a must.
2. Install the Oil Feed Line Fitting
- Find the oil feed port (usually near the front of the block or by the water pump).
- Thread in the feed fitting using a crush washer.
- Tighten it gently, as you’re dealing with aluminium parts here.

3. Add the Oil Drain Fitting
- Lightly oil the O-ring on the drain fitting.
- Slide it into place and fasten with a bolt (usually M6).
- Make sure it’s snug, not over-torqued.

4. Mount the Exhaust Manifold
- Start by placing the gasket between the manifold and cylinder head.
- Hand-thread bolts, then torque them from the center outward to prevent leaks or warping.
- Use anti-seize on bolts if your manifold gets really hot.

5. Prep the Turbo Mounting
- Thread studs into the turbine housing.
- Attach the turbo to the manifold using lock nuts and washers (like Nord-Lock if supplied).
- Keep things a little loose for now, you’ll align it later.

6. Connect the Downpipe
- Attach the V-band clamp or 2-bolt flange (whichever your kit uses).
- Just finger-tighten it for now so you can adjust the fitment.
- Make sure everything sits right before tightening fully.
7. Install the Wastegate(s) and Dump Tubes
- These often go behind the engine, which is a tight and awkward space.
- Install one side at a time, starting with the easier access point.
- Leave clamps loose until everything is positioned.
Important: Don’t forget to install firing rings (if included) for proper sealing.
8. Mount the Turbocharger
- Attach the oil drain line with red RTV and bolts.
- Thread in coolant fittings (usually with crush washers).
- Leave lines and bolts slightly loose, we’ll dial things in later.
9. Route the Oil Drain Line
- Connect the soft line to the hard drain line.
- Feed the hard line down to the oil return fitting on the block.
- Slide the turbo into the turbine housing only after everything lines up.
- Tighten slowly and evenly once everything fits right.

10. Install Coolant Lines
- One line usually goes to the front (crossover pipe), the other to the rear (thermostat housing).
- Wrap heat shielding around both lines; these areas get hot.
11. Reinstall the Compressor Cover
- Slide it into place from the bottom and rotate up.
- Leave bolts slightly loose.
- Align it with your intercooler piping before final tightening.
12. Connect the Oil Feed Line
- Route it along the valve cover or head.
- Use P-clamps and factory bolts if provided.
- Connect it back to the feed port you installed earlier.

13. Final Assembly
- Tighten the compressor cover fully.
- Attach your intake and upper intercooler pipe.
- Double-check every bolt, clamp, and line.
- Look out for clearance issues, especially near heat sources or moving parts.
- Reconnect the battery.
Also Read: 7 Key Signs Your Turbo Needs Replacement
FAQs
1. Can you install a turbo yourself?
Yes, if you’re mechanically skilled and have the right tools. But it’s complex, better left to a pro if you’re new to engine work.
2. What to do before installing a new turbo?
- Check engine health (compression test)
- Upgrade fuel system
- Ensure proper cooling
- Plan oil lines
- Schedule ECU tuning after install
3. What all is needed for a turbo setup?
- Turbocharger
- Turbo manifold
- Downpipe
- Intercooler + Piping
- Blow-off valve or wastegate
- Oil lines
- ECU tune
- Fuel system upgrades (injectors/pump)
4. Can I convert a normal engine to a turbo?
Yes, but not all engines are built for it. You’ll need supporting mods and a careful setup to avoid engine damage.
Final Thoughts
So there you have it! A full breakdown of how to install a turbo on your own. It might seem overwhelming at first, but once you take it step by step, it’s actually pretty doable. Just stay patient, double-check your work, and don’t rush things.
At the end of the day, there’s nothing like hearing that turbo spool for the first time, knowing you made it happen. Good luck, take your time, and enjoy the process. You’ve got this!